Showing posts with label tutorials. Show all posts

Tuesday, December 11, 2012

Bottle Toppers!

You'll love making these bottle toppers to top off bottles of wine, spirits, vinegar, oils...it goes on and on! 

1. Trim a piece of cardstock to measure 5 1/2 X 6 inches. Score your cardstock at 3 inches and then flip around and score at 3 inches. You'll be left with a piece of cardstock with four portions, 2 that are 3 X 3 and 2 that are 2 1/2 X 3.


2. Cut off the top left 2 1/2 X 3 inch portion as pictured.


3. Punch a 1 and 1/2 inch circle on the remaining top portion of cardstock. Round the edges of the same portion.

4. Attach a 2 3/4 X 2 3/4 inch square onto the bottom right portion of cardstock and now we'll decorate the front!


5. Because this card is to top off a wine bottle I'll start with a 2 3/4 X 2 3/4 piece of cork paper.


6. Next we'll add a 2 1/2 X 2 1/2 inch square of pattern paper, a 1 X 2 1/2 inch strip, and a die cut snowflake (I used a coffee sleeve).


7. Finally add your sentiment and a little bit of twine and a button!!


8. Attach finished portion to your cardstock. Top off your wine bottle and it's all dressed up and ready to go!


Monday, August 8, 2011

Power in the Petal


If you'd like to learn how to make this ribbon flower click here and you'll be redirected to the Maya Road Design Team blog :)

Have a happy day,

Monday, July 11, 2011

Fun Summer Projects

Happy Monday!

I just posted a couple tutorials over at the Maya Road DT blog...check them out here!


Blessings,

Tuesday, May 31, 2011

Magnetic Scrapbook Page!

I often take a picture that I would love to scrapbook right away...but time usually isn't on my side so they often get left in the "to do" pile.  With this magnetic board I can quickly add a title, some simple journaling or a favorite quote to match my picture and it's done just like that.  When I've got some time I can then make a page using what is already on my magnetic board!

To make a magnetic board you'll first need to purchase a round pizza pan from your local dollar store...you'll want an inexpensive one because magnets don't stick to the expensive/heavy ones!

Next decorate the tray...I used papers and embellishment from the Basic Grey Hello Luscious Line from the LCOM store!


Then add magnets to the back of a clothespin and Basic Grey Wheels...

Finally, add your title, picture and journaling!

Have a great day,

Thursday, May 5, 2011

Beautiful Reusing!

If you are looking for a quick gift or want to spruce up a table just decorate a plain can!


It is so easy to do...just measure the can, cut out pattern paper to fit and decorate...


Once you are done adhere paper to tin can and add flowers.

Wednesday, April 13, 2011

Treasure Card How To

I had the pleasure of crafting with the American Crafts Campy Trails collection from Let's Capture Our Memories.

Here is a quick "how to" on my treasure card...

For card base trim pattern paper to measure 4 X 5 1/2. Cut out three circles.


Cut a piece of pattern paper to measure 4 X 2.  Sand edges (the paper I used was embossed).  The sanding tool I used is made by We R Memory Keepers and it is fabulous!  One of the best things is the little handle to hold onto :)


Now this is my favorite part of the sander...this little edge distresser...it's two tools in one and plus it is pink :)


Distress the edges of circles and add to the front of card with foam squares.


Using American Craft Thickers (Campy Trails Vanilla) add sentiment to front of distresed 2 x 4 pattern paper. Add this to the front of card.


To complete my card I added a little banner border from the Campy Trails collection.


Have a great day!

Monday, April 4, 2011

Covered NotePad Tutorial

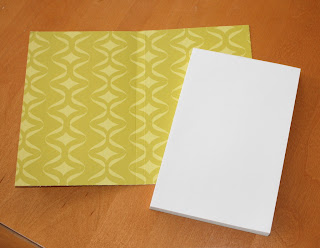
These covered notepads make a perfect little gift!  They are very quick and fun to make :)

The Supplies:
notepad (mine is 3 7/8 X 6)
pattern paper
embellishments
paper trimmer
adhesive

The Instructions:

1.  Trim pattern paper to measure 6 X 8 1/4.


2.  Score at 4 and 4 1/4.

3.  Attach notebook on the right hand side of pattern paper.


Embellish as desired!


Have a great day,

Tuesday, March 15, 2011

Mini Book Tutorial!


The Supplies:
corrugated cardboard
cardstock
embroidery floss
pattern paper

adhesive
needle

The Instructions:
1.  Trim two pieces of corrugated cardboard to measure 3 1/2 X 4, as well, cut a piece of cardstock to measure 2 X 4.  Glue your corrugated cardboard onto your card stock as shown...making sure to leave at least 3/4 of an inch in the centre.

inside:

outside:


2.  Cut a piece of pattern paper to measure 2 X 4 and use to cover the piece of card stock on the outside of book.


3.  Fold mini book to form a spine.


4.  Trim three piece of cardstock to measure 4 X 7 and fold in half. Place one piece of folded cardstock inside the book, along the spine, and poke holes using a push pin along the fold line...make sure that you push your pin through the spine of the book as well.


 5.  Handsew the cardstock page to the spine.  Repeat with the other sheets of cardstock.

inside:


outside:
The book is now ready to be decorated!


Blessings,